grandkids sandbox
Inspired by, Pinterest and Be Cool Grandpa
Skill level: Moderate
items:
Tools:
- Tape Measure
- Speed Square
- Pencil
- Drill
- Circular Saw
- Sander
- Drill Bit Set
- Power Screw Driver
(Lumber-Pine is fine, but smooth Cedar is best.)
- 2-1x8 @ 8 Feet Long
- 6-1x4 @ 8 Feet Long
- 1-2x4 @ 8 Feet Long
- 8 exterior grade hinges
- Rope - 4 feet for Handles, about 3/8 inch thick. Or 4 exterior handles.
- 1 1/4 inch screws (box)
- 1-1/4 Pocket Hole Screws - Amazon Link
- Wood Glue
- Paint or Stain (with painting supplies)
- Garden weed barrier fabric (this will go under the sandbox)
- Play Sand (3 to 4 50 lb bags)
Cut List: (most lumber stores and some warehouse stores will cut these to size for you.)
(a) 2 - 1 x 8 @ 47 1/2" - long sides of box
(b) 2 - 1 x 8 @ 46" - short sides of box
(c) 12 - 1 x 4 @ 47 1/2" - top planks
(d) 4 - 2 x 4 @ 7 1/2" - arm rests
(e) 4 - 2 x 4 @ 12 1/2" - back support/handle
instructions:
Step 1- Measure and cut frame dimensions.
(2) 47 1/2”
(2) 46”
Step 2- Create a basic box, insetting the short sides as shown by 2 3/4”. Pre-drill through the long sides and use (3) 1 1/4" screws.

Step 3 - Screw in two planks on each side, countersinking your screws through the top. Space the boards 1/2" apart

Step 4 - Create what will become the seat. Screw the 1 x 4 boards (1/2" apart) onto the 2 x 4 arm rests (d). Make sure that the 2 x 4s are at least 1" inset from the edge to allow for them to fold into the box nicely. (you'll be making two of these)

Step 5 - Add hinges as shown. Place the seat that you made in step 4 to the plank you screwed in in step 3. Note: I found it easier to attach the hinge to the seat (on the side opposite the arm rests) and THEN attach it to the screwed-in plank. Make sure to space them 1/2" apart.

Step 6 - Build the back part of the seat which will also be part of the cover when closed. Space the planks 1/2 in.

Step 7 - Attach your second set of hinges to the seat back, on the opposite side of the 2 x 4’s, and then attach to the seat (easy to do with the seat "up"). Make sure to space the 1/2" apart.

Step 8 Lay the garden weed barrier fabric down in the sandbox and tack it to the sides using some screws or staples. The pour in the sand and spreed evenly.


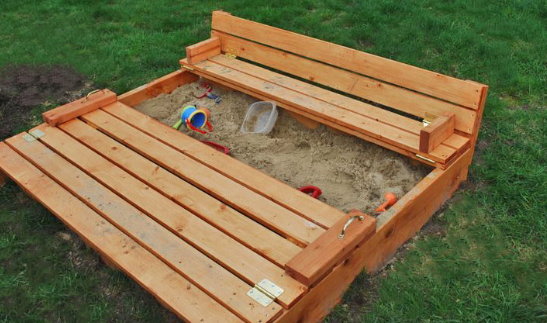
Finished. This is what it will look like with one seat up and one seat down.

grandpa’s thoughts:
The reason I like this design is for three reasons. Firstly, everyone with a sand box knows that lids are a necessity. Secondly, the lid converts to a seat! Thirdly, it’s pretty easy to build this sandbox.
It's a flat deck when closed, a sandbox with built-in seats when open!
You can do this grandpa. Remember measure three times and cut once.
