lemon tart with pine nut crust
Inspired by, Thomas Keller
Serves: 8
Prep time: 15 min. Ready In: 1 1/2 hrs.
Skill level: medium
Cooking method: Oven and Stove top with saucepan and larger mixing bowl.
ingredients:
Pine Nut Crust
Yield: Three 9-inch crusts
Equipment:
Food processorBench scraper
Plastic wrap
Fluted 9-inch nonstick tart pan with removable bottom Glass with flat bottom and straight sides Sheet pan.
Lemon Sabayon
2 large eggs, cold
2 large egg yolks, cold
150 grams (2/3 cup) granulated sugar
120 grams (2 1/2 large lemons) fresh lemon juice
85 grams (1stick) unsalted butter, cut into 1⁄4-inch cubes, cold
Equipment:
Saucepot with a diameter that is slightly smaller than that of the mixing bowlTart shell
Slicing knife
Plate or cutting board
instructions:
Pine Nut Crust
Step 1) Preheat oven to 350 degrees and position a rack in the middle of the oven.
Step 2) Place the pine nuts in a food processor and pulse until halfway ground, being careful not to grind the nuts too much, which will extract the oil from the nuts and affect the consistency of the dough. Add the flour and sugar to the food processor and pulse until you can just barely distinguish the nuts from the rest of the ingredients.
Step 3) Turn the mixture onto a clean work surface and gather it into a mound. Form a well in the center and add the egg and butter into the center of the well. Use your hands to mix the egg and butter, incrementally incorporating the flour mixture. Use the bench scraper as needed to bring the ingredients together. The dough may seem dry, but as you work it, the butter will be absorbed into the flour. When the dough starts to come together, knead it with the heel of your hand to further blend the ingredients and to form one homogenous mass of dough.
Step 4) Shape the dough into a loaf and then divide it equally into thirds. Form each third into a disc, approximately 1 inch thick, then wrap each piece in plastic wrap. Refrigerate the dough you’ll be using immediately for at least 10 minutes to let it rest. Place the extra wrapped discs of dough into a resealable freezer bag and freeze for future use.
Step 5) Transfer the rested dough to a nonstick fluted tart pan—there’s no need to butter or flour the pan. Begin removing small pieces of dough from the disc and pressing them up against the sides of the pan. Be mindful to maintain a uniform thickness, approximately 3/16 inch, around the edge of the pan. After the sides of the pan have been lined with an even layer of dough, press pieces of dough onto the bottom of the pan until it’s completely and evenly covered. Make sure the dough forms a tight seal in the corners where the sides and bottom of the tart meet.
Step 6) Use your fingers to remove any excess dough that protrudes above the edge of the tart pan and smooth off the edges for a finished look. Gently press the side and bottom of a glass against the dough at the sides and bottom of the pan— this will even out the thick- ness of the dough at the corners.
Place the tart pan onto a sheet pan and into the oven. Bake the tart shell for 17 to 20 minutes, or until golden brown. Let the crust cool before filling it.
Lemon Sabayon
Step 1) Position the oven rack in the topmost slot, right under the broiler, and preheat the broiler. Keep the oven door open slightly so that the temperature in the oven does not get too hot.
Step 2) Bring about 11⁄2 inches of water to a boil in a saucepot. Make sure the water is shallow enough so that it will not touch the bottom of the mixing bowl when the bowl is set on top of the saucepot. Add the eggs and sugar to the mixing bowl and place the bowl over the saucepot. Immediately reduce the heat to low. Whisk the mixture continuously while stabilizing the bowl. (You can also use an electric mixer if you don’t want to whisk the sabayon by hand.) Hold the bowl with a kitchen towel to protect yourself from the heat.
Step 3) After about 21⁄2 minutes, the mixture should thicken and be in
the ribbon stage. You can tell when you’ve reached the ribbon stage when the lines from whisking persist for a brief moment on the surface of the mixture. Also, when you lift the whisk above the bowl, the mixture should fall back into the bowl, forming “ribbons.” Once the mixture has reached this stage, add 1/3 of the lemon juice.
Step 4) Whisk the lemon juice into the mixture in a figure-eight motion until the mixture’s consistency returns to the ribbon stage, about 1 minute. Add another 1/3 of the lemon juice. Whisk until the mixture thickens to the ribbon stage again, another minute, then add the last of the lemon juice. Whisk until the mixture returns to the ribbon stage.
Step 5) The total cooking time is approximately 6 minutes. It is very important to whisk continuously this entire time to prevent the eggs from getting too hot and scrambling.
Step 6) Set the bowl on a kitchen towel on the counter and add the butter. Return the bowl back on top of the saucepot and whisk to emulsify the butter into the sabayon.
Step 7) Pour the warm sabayon into the tart shell set on a sheet pan. Gently tap the sheet pan against a towel-lined counter to remove any air bubbles in the sabayon.
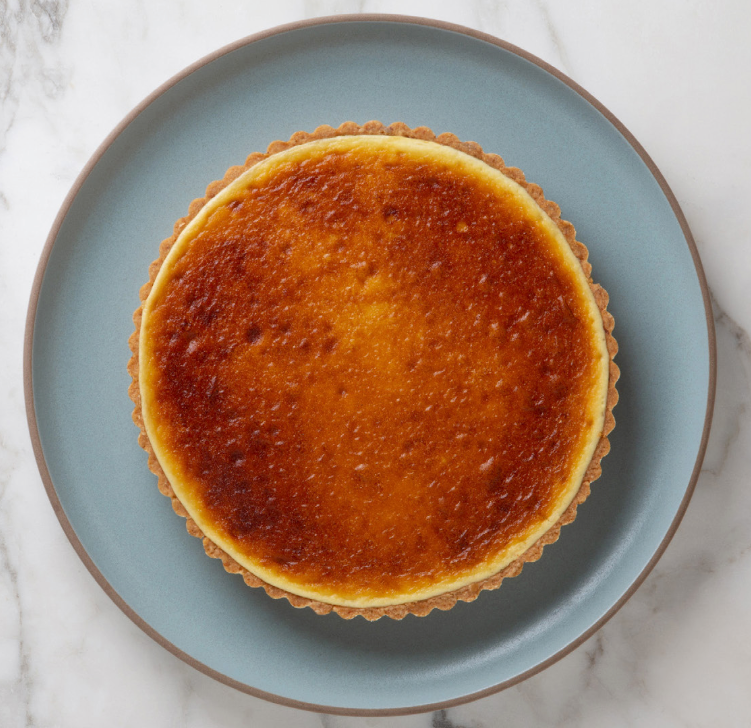
Step 8) Place the tart under the broiler, keeping the oven door open slightly to allow the top of the tart to brown without building too much oven heat that will overcook the custard. Brûlée the top of the sabayon, rotating the tart as needed for even color; do not leave the oven unattended, as the sabayon will caramelize quickly. Remove the tart from the broiler, and let it sit for 1 hour at room temperature before serving. If you’re serving it more than 1 hour after broiling, let the tart cool to room temperature first before placing it in the refrigerator. Serve at room temperature or cold. Sprinkle a little powder sugar on top and serve.
Step 9) When slicing the tart, dip your knife blade in hot water, dry it on a towel, and then slice the tart with the hot but dry blade. Repeat this process for each cut.
grandpa’s thoughts:
Chef Thomas Keller’s is my go to for recipes. I love his style and the detail that go into each dish. The pine nut crust is delightful and easy to make. The tart filling is kinda fun to make. Using the double broiler it really makes it easy to control the temperature.
I also like to let it set up in the refrigerator for several hours. But you can serve it warm. Sprinkle a little powder sugar.