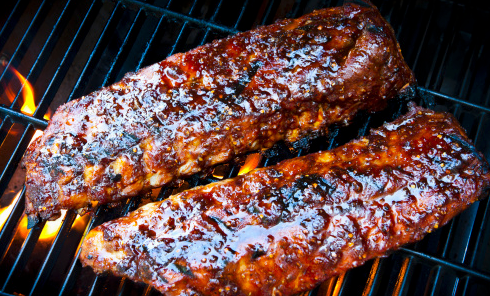
pork ribs (baby backs or spareribs)
Prep Time: 30 mins Marinade time: 18 hours Cook time: 6 hours, plus 1 hour rest
Skill Level: Moderate. Takes time and a few steps
Cooking method: Smoker
ingredients:
Pork Ribs
• 3.5 lbs+ racks of pork spareribs or Baby Backs (spareribs are my personal preference)
• 1/2 cup black pepper
• Paprika, to taste
For the binder...
• Yellow mustard and only yellow mustard (enough to lightly cover the ribs on both sides)
instructions:
Step 1) This step is more for spareribs. Prep the rack of ribs. Lay the rack parallel to the bottom edge of your cutting board and identify the “top” and “bottom” edges. The top of the ribs should be more or less a straight line, whereas the bottom edge will have more of a curve; this is where the ribs connect to the sternum and belly. The presentation side of the ribs (the “outside”) will be the side that looks cleaner and meatier. The “inside” of the ribs is where you’ll find the skirt, the silverskin, and more pockets of fat.
Step 2) Use a knife to cut the sternum off at an angle as well as the thick section of cartilage behind it. Then clean the bottom edge with a thin slice along the bottom length of the ribs, removing any stray bits of flesh and cartilage and leaving a smooth, slightly curved edge. Finish this part of the trim by rounding off the far end of the rack opposite the sternum, so that it has a clean shape.
Step 4) The rub. I like to make the simplest rub ever, combine salt, black pepper, paprika (to taste) into a shaker or container with lid. Shake to thoroughly mix. Set aside until ready to use. Or you can use your favorite rub.
Step 3) The night before, apply the binder (mustard) and the rub. Go light with the binder on the meatier side of the ribs—the texture should be tacky rather than wet—and a little heavier with both the binder and the rub on the fattier portions, as the extra stickiness will help the smoke adhere and give the ribs a more uniform flavor. The “outside” of the ribs is your presentation side, so apply the binder and rub to the “inside” first. Use one hand to move and slather the meat, and the other to sprinkle the rub. Moving from side to side, parallel to the rib bones, distribute the rub in an even layer along the length of the rack, then flip it over to the presentation side and repeat.
Step 4) Rap and refrigerate. Roll out some plastic wrap and wrap each rack separately. Put the ribs on a tray and refrigerate for 8 hour or overnight.
Step 5) Prepare the slather: Pour 2 cups of your favorite BBQ sauce with 1 cup of apple cider vinegar into a squeeze bottle. Shake it up and set aside until ready to use.
Step 6) Prepare the spritz: pour 1+ cups apple cider vinegar into a spray bottle. Set aside until ready to use. I recommend not using anything with sugar for the spritz. Sugar burns and can change the smoke flavor.
Step 7) Make a plan: Determine when you hope to eat the ribs and work backwards, accounting for its 6-hour cook time plus about 1⁄2 hour of prep time (including time for the raw meat to rest at room temperature. Allow 30 to 40 minutes of resting time once the meat is cooked (about 7 hours total). Just jot down cook times: Note the times when the meat will be cooking unwrapped, wrapped, and resting so you can easily keep track.
Step 9) Prep your smoker and let it come to 265 degrees. Allow the smoker to hold the temp of 265 F for 30 minutes before you place the ribs on the smoker. Consistent temp and clean smoke though out the cook is important.
Step 10) Some like to keep a pan of water placed inside the smoker. This is your option.
Step 11) Place the ribs in the smoker camber. Check the meat at the end of the first and second hours, spritzing the edges with the apple cider vinegar as needed to cool them off and keep them moist. During the first 3 hours of cooking, you don’t want the fat to render, so spritzing reduce your cooking temperature. The strategy is to have the fat render only after the ribs are wrapped, so it can emulsify with your sauce.
Step 12) After the second hour of cooking, apply the slather (rib sauce and apple cider vinegar) in a squeeze bottle and shake thoroughly. Mixing the ingredients will make the sauce thinner and reduce the overall amount of sugar (which is liable to burn in the smoker).
Step 13) At 2.5 hours, thoroughly spritz the rack of ribs with apple cider vinegar so that the surface is wet to the touch. Squeeze the slather on top of the ribs. With your hand, work the sauce around the sides and surface of the ribs until the entire presentation side is coated. Give it one more light spritz, then close the lid and allow the sauce to set for approximately 10 minutes. Flip the ribs over and repeat the saucing process on the other side.
Step 14) After the rib sauce has had a chance to set on the non-presentation side of your ribs— about 10 more minutes—remove the rack from the smoker. Be sure to use your hands for this rather than a pair of tongs, as the jagged metal could cut into the ribs as you move them. (To avoid burning your hands spritzing your hands to cool the skin before you touch the ribs, or you could also pick up the ribs with a towel.) You might notice little chunks of bone have started to emerge as the meat has shrunk.
Step 15) Wrap the ribs. Cut a sheet of wide aluminum foil that’s twice as long as the length of your ribs. Place the foil on your workstation with the longer edge running parallel to the bottom of your workstation and the shinier side facing up. Spritz the foil and spread a little more barbecue sauce on top, then lay the ribs presentation side down on top of the sauce, about 3 inches from the bottom of the foil. Give the non-presentation side of the ribs one last spritz.
Step 16) Fold 1 end of the foil over the ribs, then the other. Both ends should overlap in the center. Use your fingers to tuck the foil tightly around the bottom edge of the rack until the foil conforms to its shape. Smooth out the foil and tuck it in tight.
Step 17) Return the wrapped ribs to the smoker with the seam of the foil facing up and cook for 3 more hours at 265oF. After the final 3 hours on the smoker, remove the ribs and set them on your workstation with the seam of the foil facing up. Feel around the sternum for the third rib bone. If the meat around the bone feels soft and pliable, that’s a good indication that your ribs are done. Allow the ribs to rest in the foil for about 30 to 40 minutes.
Step 18) Unwrap the foil, being careful not to spill any juices. The ribs should land presentation side up on your cutting board with the juices pouring on top. With a knife, slice the ribs in between each bone and serve.
grandpa’s thoughts:
I know I've gone through a lot of steps here, but I've done this for years and years and this is the best method I have found for cooking ribs.
Don’t be nervous, it really is pretty simple and it's a great place to start if you've never used a smoker before. Meat can be expensive, but Pork ribs have always been reasonable in price.
Grandpa note: Please experiment and use what works best for you. But I would recommend writing down your formula so you don't forget the details.