brisket
Inspired by, Aaron Franklin
Prep time: 45 mins Cook time: 12 + hours, plus 1 hour rest
Skill level: Medium to frustrating, but takes time and many steps. If it doesn’t work then its frustrating because it’s an expensive cut of meat.
Cooking method: Smoker
ingredients:
Full Brisket• 12 lbs+
instructions:
This takes some time, but stay with me and follow all the steps.
Firstly, a little back ground from Aaron Franklin about the brisket cut. As he said “it’s the mother of all texts BBQ cuts.”
A full brisket comprises two overlapping muscles separated by a layer of seam fat. The leaner, more rectangular muscle is the pectoralis profundus—more commonly known as the flat—while the fattier, more bulbous muscle is the pectoralis superficialis, aka the point. The flat is often sold by it- self in butcher shops, but for central Texas–style barbecue, you’ll want a packer cut that includes both the point and flat.
When choosing a brisket, look for cuts that have a good amount of fat marbling. Remember: prime grades will have the most, followed by choice and select. Give the brisket a once-over and then see how it feels in your hands. It should be firm but not completely stiff. A brisket that’s too rigid may not have a lot of marbling. A thick, hard fat cap is also an indication that the cow might have been raised on hormones, antibiotics, and industrial feeding methods to get it to slaughter- ing weight more quickly.
If the brisket is enclosed in Cryovac, take note of how much blood there is in the packaging— if there’s a lot, that’s a good sign that the brisket was previously frozen. Freezing is detrimental, because ice crystals can tear apart the meat fibers. The torn fibers may also make a previously frozen brisket feel mushy and saggy when you hold it in your hands.
Finally, while the brisket will always be thicker at the point than the flat, the closer the two muscles are in size, the easier it will be to cook them at approximately the same rate.
The Prep: TRIMMING
Since every animal is different, every brisket is going to have different needs when it comes to trimming.
At the end of the day, you want each slice of brisket to have the perfect balance of meat, fat, bark, and smoke. Every trim you make is always in service of that goal. First and foremost, that means removing excessive fat. While marbled fat is crucial to a good piece of beef, a brisket will usually have a thick cap of subcutaneous fat that is more than you want to eat. However, trimming too much of that fat can sometimes threaten the structural integrity of the brisket. It’s always better to leave a little extra fat if it means preventing the brisket from falling apart in the smoker. Always ask yourself what serves the greater good.
The second reason we trim is to enhance the shape of the brisket. You want to maximize airflow around the meat and remove any protruding parts that are liable to dry out during the cook. Like an airplane or a sports car, your brisket should have smooth, aerodynamic curves: no boxy lines, no 90-degree angles.
STANDARD TRIMS
While you’ll ultimately call upon your own judgment and experience in deciding what to trim from the brisket, there are a few standard trims Aaron makes with each brisket. He prefers to use a stiff, curved, eight-inch boning knife that allows him to slice into the fat and meat more easily than a knife with a straight blade.
BRISKET SIDES
If you look at the long edges of your brisket, you’ll notice that one side is rougher in texture and likely has some discoloration. This is the side that was split from the carcass and treated during processing. It’s already been cooked a tiny bit, which means it won’t take on any smoke or flavor during the cook. Remove about half an inch from this edge with two or three long, smooth strokes of a boning knife. Do the same on the other side as well, to better expose the flat and even out the shape.
Next, depending on how thin the flat of your brisket is, you may want to trim off a couple inch- es from the end to reach a point where the meat is thick enough to survive a long cook without drying out.
FAT
Lay your brisket fat-cap side up and look for dimples on the surface of the fat near the center of the brisket — that’s where the fat cap likely ends. With your boning knife, cut into the fat at a curved angle and then move the blade along the length of the flat, peeling back the top layer of fat with your other hand as you go. You’re trying to expose the soft white fat beneath the waxy exterior. Gently shave the upper layers away with your knife until all that’s left is a layer of pillowy fat approximately a quarter-inch thick.
Next, trim away some of the hardened fat from the side of the point. You’ll notice a thick, unren-derable pocket of seam fat directly beneath the point. Leave that for now—removing it before the cook could make the point collapse. You can trim it later when you’re slicing the cooked brisket.
urn the brisket over so the fat cap is facing down. You’ll see a big chunk of exposed seam fat right where the flat and the point connect. Make a few entry cuts into the fat, then peel and slice it off, in the way you did the fat cap. Finish by removing any other stray bits of fatty membrane.
ANYTHING WEIRD
A packer cut may or may not include the deckle, a thick layer of hard fat that connects the flat to the rib cage and will contribute nothing to the quality of your brisket. If it’s there, get rid of it. You should also remove bits of silverskin—shiny bits of connective tissue, like the membrane on the underside of a rack of ribs—and any strange, unidentifiable bits of muscle from other parts of the carcass that were left attached to the brisket.
A NOTE ON TEMPERATURE
Brisket should spend some time at room temperature before it goes on the smoker, but for trim- ming you want it good and cold. Fat becomes sticky and more difficult to work with as it warms, so keep the brisket refrigerated until you’re ready to trim.
SLATHER AND RUB
With brisket it’s best to keep the seasoning simple and clean. Every bite should taste of smoke and the natural flavor of the beef.
For the rub, use equal parts kosher salt and 16-mesh “café grind” black pepper. In general you want to taste both in equal measure, but you can go a little heavier on salt with the fattier point and heavier on pepper with the leaner flat if you prefer. You’ll need about cup of seasoning for a 12-pound brisket. For the slather, use either mustard or hot sauce; after 12 hours in a smoker, you won’t really taste it anyway.
The fattier side of the brisket is the presentation side, so apply the rub to it last. As always, use one hand to move the brisket and apply the slather, and the other to sprinkle on the rub. Starting with the fat side down, slather the meat with mustard, hot sauce, or a bit of water, getting the surface just wet enough for the rub to stick. (No need to over- slather—after 12 hours in a smoker, you won’t really taste the slather anyway.) Next, shake the rub across the brisket from side to side in an even layer until the entire side is covered. Keep an eye out for any gaps or imperfections in the surface of the meat as you go, and avoid filling deep pockets with salt and pepper. Gently pat the rub into the meat once you’ve finished.
With the meatier side still facing up, cup your free hand along one edge of the brisket. Pour the rub directly into your hand as you move along the length of the brisket, evenly pressing the rub into the side as you go. Repeat on the other side, then flip the brisket over so it’s s fat side up. Apply the slather to the fat side, then sprinkle the rub on top, patting it in at the end. Allow the brisket to rest at room temperature for 30 to 40 minutes. The meat will begin to absorb the rub and the salt will start drawing out the internal moisture.
The Cook: Have A Game Plan
Total Cook Time: 12 hours for a 12-pound brisket
See chart when you the Download the PDF on the top of this page (Download PDF)
STAGE 1
While your brisket sits at room temperature, bring the smoker’s temperature to a consistent 255°F. If it runs a little lower at first, no big deal. Even though the brisket has been sitting out, the internal temperature will still be quite cold. You don’t want to shock it with sudden exposure to high heat.
Place the brisket in your smoker with the point closest to the fire source and shut the lid. Leave undisturbed for the first three hours of the cook, maintaining a constant temperature of 255°F and clean, light smoke with a bluish hue. It’s in these early stages that the brisket’s flavor base is established, so it’s important to focus on your fire and the quality of smoke coming out of the smokestack.
STAGE 2
After three hours, open your smoker and check in on the brisket. By this point it should have a mahogany hue and a consistent bark.
If the brisket looks like it’s burning, if the bark is splotchy, if it’s turning dry and crisp in places, or if the fat is already starting to render, chances are you need to cut back on the heat. Discoloration without signs of dryness or rendered fat could also be the result of dirty smoke. Pay close attention to the quality of wood you’re burning and the appearance of your smoke over the next few hours. If your cook has gotten off track a bit in the early stages there’s still time to course correct.
Before closing your smoker, spritz the dryer, vulnerable edges of the brisket to cool them off. Unless your fire has already been running too hot, raise the temperature to between 260°F and 265°F and continue to cook for another three hours, checking the brisket and spritzing once per hour.
STAGE 3
After approximately six hours, your brisket will hit a stage known as the stall. It’s a product of evaporative cooling: once the internal temperature of the brisket hits around 165°F, the muscles will start to tighten up, forcing moisture to the surface of the meat, and thus, cooling down the brisket. Beef is technically considered well done by the time it hits 165°F, but if you attempted to eat the brisket at this stage, the meat would be incredibly tough. The key to getting it tender is raising the internal temperature above 180°F, at which point tough collagen in the meat will start to break down into gelatin.
To push the brisket through the stall, begin ramping up your cooking temperature to between 280°F and 285°F, right before the stall. Don’t worry about burning the brisket — the moisture that’s rising to the surface will counteract the higher heat. Cook for approximately one hour at this temperature, then lift the brisket and check for stiffness. If it bends at the edges, that’s a good sign you’re through the stall.
STAGE 4
Once you’re through the stall, it’s time to decide when the brisket is ready to wrap. The fattier point has more margin for error if it overcooks, so the flat should be your barometer. Lift the edge of the flat from the underside with your fingers; when it’s firm but a little floppy, it’s ready to go. Another telltale sign is the bark—if it’s starting to crack in places, that means the fat is rendering.
You can wrap the brisket in foil if you like, but butcher paper is more breathable and traps less steam, keeping the brisket moist without making the bark soggy. If you prefer a super crunchy bark you can also leave the brisket unwrapped, though you’ll need to be careful it doesn’t dry out.
For the wrap, you’ll need two wide sheets of foil or butcher paper that are four times longer than your brisket is wide. Place one sheet of paper on your workstation, with the long edge running perpendicular to you. Place the second sheet on top so it overlaps by about half its width. Lay the brisket lengthwise across the paper, presentation side up, about one foot from the bottom edge. Give the brisket one last spritz anywhere that a needs little moisture, then lightly spritz the surface of your wrap for good measure.
STAGE 5
Once you’ve wrapped the brisket, return it to the smoker with the point closest to the fire. At this point the brisket won’t take on any more flavor from the smoke, so you should concentrate on temperature rather than maintaining a clean fire. If you have junkier pieces of wood you’ve held off on using, you can toss them in now.
Cook undisturbed for approximately three hours at 275 to 285°F, then gradually allow the temperature to taper off for another hour as your cook gets closer to the end. Bear in mind that residual heat will continue to cook the brisket even after you take it off the smoker.
See wrap chart when you the Download the PDF on the top of this page (Download PDF)
STAGE 6
Using a towel to protect your hands, pick up the brisket and carefully move your fingers up and down the length of it, checking for tenderness. It’s important to keep checking on the brisket at regular intervals at this point, roughly every 15 minutes or so. As the collagen continues to break down and the fat continues to render, the brisket will become more soft and pliable, but if you leave it on the smoker for too long it will overcook. Better to pull it too soon than leave it on too long. If the brisket feels loose and somewhat flexible in your hands, even a bit jiggly, it’s done.
Once you’ve pulled the brisket, allow it to rest in its wrapping until it cools to an internal temperature of 140 to 150°F. That will take a little time. The outermost layers of the brisket receive heat immediately from the convection of air and smoke inside the cooker, but the innermost layers receive heat via conduction—the slow, gradual absorption of heat from the outer layers. So even though the brisket is technically no longer receiving heat, the interior of the brisket will continue to cook. This is known as carryover cooking. How long it takes will depend a lot on the temperature of your environment and how hot your cooker was. (Think: Momentum). It’ll happen faster on a cool, breezy day than a hot, humid one. Factor in at least 30 minutes and up to an hour or two.
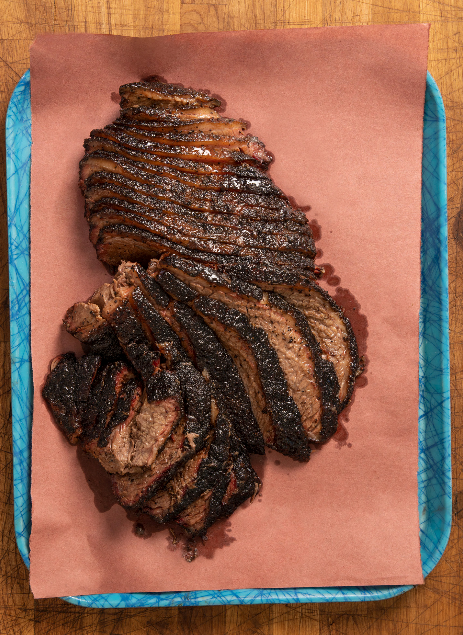
THE PRESENTATION
SLICING TECHNIQUE
Once you start slicing the brisket and the meat is exposed to the air it will immediately start to oxidize. You only have a limited amount of time with it in its perfect state, so hold off on slicing until you’re ready to serve.
To slice the brisket you’ll need a knife with a long blade that you can push and pull through the meat in smooth, even strokes. It doesn’t have to be anything fancy—Aaron’s preference is an inex- pensive 12-inch serrated bread knife—it just has to be capable of cutting through the brisket with minimal pressure.
Typically when you’re using a knife in the kitchen, you’ll curl the knuckles of your guide hand so you don’t end up accidentally cutting your fingers. With brisket, you’ll need to use your guide hand to shape and protect the meat as you slice. Always be aware of where your fingers are and be careful.
Note the different effects that pushing and pulling the knife have on the meat. For instance, say the side of the brisket closest to you is a bit drier and more liable to fall, apart, finishing the slice on a push stroke will help keep the entire slice intact.
The traditional way to slice brisket in central Texas is to slice the flat and point separately so your guests can have a combination of lean and fatty meat. In both cases you’ll be slicing against the grain of the meat, but you’ll approach each in a different way.
THE FLAT
Starting with the corner opposite the point, begin slicing the flat at an angle against the grain. Each slice should be about the width of a No.2 pencil. As you progress along the length of the flat, gradually start tapering the slices in thickness. That means you’ll have some slices that are slightly thicker on one end and thinner on the other, but by the time you finish with the flat, your slices should be perfectly straight across.
THE POINT
Cut off and discard the thick pocket of seam fat that lies under one side of the point—the piece we left in place so the brisket didn’t collapse. Next, slice the point in half lengthwise — this is known as the “money shot” of central Texas barbecue. Both the marbling fat in the muscle and the seam fat running through the center should have rendered perfectly. The bark should have a nice texture. The front part of the brisket that was closest to the fire shouldn’t be crunchy or dry and the fat cap on top should be less than a quarter-inch thick. If your brisket didn’t turn out quite right in any of those areas make a note of it—you can then revisit the data you collected on your game plan and figure out what adjustments to make next time.
Point slices should be a little thicker than the flat—about "-inch thick. Start with even slices that cut straight across the muscle, then gradually taper the slices on the side closest to you so they’re a little thicker on one end than the other. That way you can avoid having a final slice that’s nothing but bark.
Repeat the process with both halves of the point, making adjustments as necessary in the length and thickness of your slices to avoid any pieces that are too fatty or too dry. Under one half of the point, you’ll find another thick pocket of seam fat that didn’t render but was left in place so the point didn’t collapse. Trim this off. Once you’ve done that, you’ll be left with a final piece of the flat that was beneath the seam fat and the ridge section of the point that was directly above it. Rather than serve them up as individual slices, Aaron recommends adding this last piece of meat to a pot of beans or serving it as chopped beef, while cutting the ridge piece of the point (what’s known as burnt ends) into bite-size snacks.
Your exact slicing technique will vary brisket to brisket, but your end goal with every slice remains the same: a perfect balance of meat, fat, bark, and smoke.
grandpa’s thoughts:
Like I said when cooking a brisket you need to be all-in. But the result is well worth it! This is all Arron Franklin and his recipe is the best I’ve tried.
Generally speaking it may take several brisket tries, to perfect it and it can get expensive. However, you can save some money if you go in with a neighbor or friend on a good quality of meat and team up on the cost and smoke.